Brew Portal in the Cloud#
— Firestore + Authentication
In this homework, you will extend your previous project Brew & Save by moving beverage ingredient data from static .json files to Firebase Firestore, and then adding Firebase Authentication so each signed-in user can create and manage only their own saved beverages.
Objectives#
Configure Firebase and connect your Vue app to Firestore
Load base ingredients (bases, creamers, and syrups) from Firestore
Configure Firebase Authentication with Google Sign-In
Protect the beverage dashboard so only signed-in users can create and view saved beverages
Save user-created beverages to Firestore with user ownership
Dynamically display only the beverages that belong to the current signed-in user
Strengthen your understanding of state management with Pinia
Instructions#
Accept your instructor’s GitHub Classroom invitation to create your project repository.
You may copy all necessary code from your previous project Custom Drink Maker or Brew & Save, excluding the .json files in the data/ folder.
1. Firebase Setup#
Follow the exercise on the last page of this Firestore slide.
Copy your Firebase config into the firebase.ts file provided in your repository.
Enable Cloud Firestore.
Enable Firebase Authentication and turn on Google Sign-In.
Your Firebase setup should work so that:
Firestore can store and load beverage data
Authentication can detect login and logout changes
Your app can connect beverages to the currently signed-in user
2. Firestore Initialization#
Set up the following Firestore collections and documents using following data:
bases collection
[
  { "id": "b1", "name": "Black Tea", "color": "#8B4513" },
  { "id": "b2", "name": "Green Tea", "color": "#C8E6C9" },
  { "id": "b3", "name": "Coffee", "color": "#6F4E37" }
]
creamers collection
[
  { "id": "c1", "name": "No Cream", "color": "transparent" },
  { "id": "c2", "name": "Milk", "color": "AliceBlue" },
  { "id": "c3", "name": "Cream", "color": "#F5F5DC" },
  { "id": "c4", "name": "Half & Half", "color": "#FFFACD" }
]
syrups collection
[
  { "id": "s1", "name": "No Syrup", "color": "transparent" },
  { "id": "s2", "name": "Vanilla", "color": "#FFEFD5" },
  { "id": "s3", "name": "Caramel", "color": "#DAA520" },
  { "id": "s4", "name": "Hazelnut", "color": "#6B4423" }
]
2. Pinia Store Updates#
Update your beverageStore.ts so that it manages ingredient data, authentication state, and user-specific beverages.
Your store should:
Implement the
init()action in the Pinia store (beverageStore.ts) to:Load data from
bases,creamers, andsyrupscollections in FirestoreSet this data to the store’s
bases,creamers, andsyrupsstatesSet default values for
currentBase,currentCreamer, andcurrentSyrupRun
init()before rendering the app.
Include a
setUser(user: User | null)action that:You may need to declare a user state in the store, so in setUser() you can save the current Firebase user in a user state.
Detaches the previous Firestore listener when the user changes or logs out.
Starts a new listener that watches only the beverages created by that user.
Updates beverage data when Firestore reports changes,
Sets
currentBeveragecorrectly when the beverage list updates.
Beverage Creation and Display:
Include a
makeBeverage()action that:When the
"Make Beverage"button is clicked, checks whether a user is signed in,Checks whether all required fields are filled in,
Builds a unique beverage id,
Store the current beverage document to Firestore
beveragescollection.Updates the store state so the UI responds at once,
Returns a short message such as:
"Beverage <name> made successfully!","No user logged in, please sign in first.","Please complete all beverage options and the name before making a beverage."
3. Google Login and Auth State#
Update your App.vue component so the UI responds to login changes.
Your app should:
Before the user signs in
Show a Sign in with Google button that calls withGoogle() when clicked, and no Sign out button.
The “Make Beverage” button should be disabled.
No saved beverages should be displayed.
After the user signs in
Show the signed-in user’s name (or email).
Show a Sign out button, and clicking it should log the user out.
Load and display only the beverages that belong to the signed-in user.
The Make Beverage button should be available, and clicking it should create a beverage under the current signed-in user.
The withGoogle() function should:
Use
GoogleAuthProviderSign in the user,Handle errors by showing a message in the UI,
Let the Firestore listener update the store through
setUser().
4. UI and UX Requirements#
Your interface should keep all controls from the previous project:
Temperature selection,
Base selection,
Syrup selection,
Creamer selection,
Beverage name input,
The beverage preview component.
You should also add:
A Google Sign-In button,
A clear display of the current signed-in user,
A message area for login errors and success messages,
Use onAuthStateChanged to monitor the current authentication state.
Show saved beverages for the current user:
Use radio buttons or a simple selection interface,
Update the preview when the selection changes,
Show nothing when the user has no saved beverages.
Expected Outcome#
Ingredient options are loaded from Firestore
Users can sign in with Google
Only signed-in users can create beverages
Saved beverages are stored in Firestore with user ownership
Each user can view only their own saved beverages
Selecting a saved beverage updates the preview in the mug
Reference demo: Expected Outcome Demo
Grading Rubric#
Grading Item |
Points |
|---|---|
Firebase setup and Firestore initialization |
15 |
Ingredient loading with init() and Pinia state management |
15 |
Google Sign-In works correctly and login state is tracked |
15 |
Before login: Make Beverage is disabled and no saved beverages are shown |
10 |
After login: beverages can be created and linked to the current user |
15 |
Only the current user’s beverages are loaded and displayed |
15 |
Login state changes behave correctly (logout clears UI, re-login loads correct beverages) |
5 |
GitHub Clone, Commit, Push, & Deploy to GitHub Pagesl |
10 |
Deliverables#
Deploy your web application using the following commands in your
terminal:npm run build npm run deploy
Github Page Setup
Set up your GitHub repository for GitHub Pages deployment. Follow the steps shown in the image below:
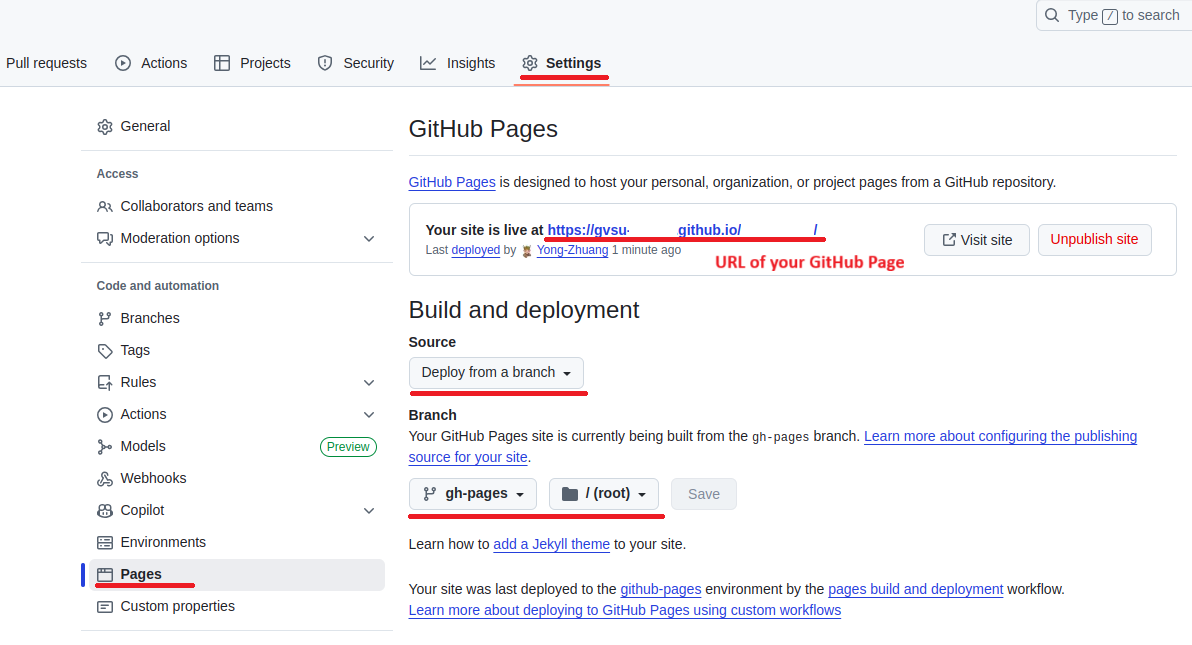 .
.Your web application will be accessible at the URL: gvsu-cis658.github.io/YOUR-REPO
Submit the URL of your GitHub Page in Blackboard.